The overall operation is the same. the improvement is the "tuna can" shaped evaporator on the bottom. It allows for greater surface area and heat transfer, allowing you to turn the oil up higher for the same temperature fire. I have seen significantly reduced melt times with this burner configuration. It also makes for more uniform operation as one cold spot in the fire will compromise the whole evaporator.
Friday, September 30, 2011
Evaporator Burner Improvements
In my youtube videos, I show my evaporator burner. Well, I've improved on the design and want to share. I'll have a video of it up shortly as well. Here's a google sketchup rendering for now.
Saturday, September 17, 2011
My Metal Casting Adventures
Its been a few years now since I stumbled across the art of melting and casting metal. I'll attempt to put together a collection of photos to detail my progress.
The first true furnace with molten aluminum.
I built another furnace that was a nice stepping stone out of the first, but I can't find pictures at the moment!
We will move on to my current big furnace. Its made out of a hot water tank.
The tank:

Laying out the bricks:
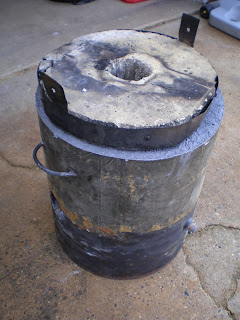
Some measurements. The tank is 18 inches wide.
I was just learning to stick weld, so I put some handles on the sides to move it easier. Good thinking.
The tank had holes for taps and things in it so I used one as an eventual drain for the furnace.
Magnesium anode or cathode..I don't know, but its magnesium. Fun Fun Fun....
The refractory I used to line the firebricks
Progress: The bricks are all cut and chamfered to fit well.
Close up. The bricks are out of an old ceramics kiln. They are very insulating and worked quite well.
The furnace after casting the refractory. The wood form was stuck int he bottom, so I just burned it out.
Completed furnace. Isn't she a beauty? the lid looks nasty because I just reused it from that previous furnace (the one without pictures).
Thats that! the furnace is done! I'll have more posts with the first firing, my burner and castings soon!
Backyard Trebuchet
Well, the neighbors had their loud music playing one night to many, so some retribution was in order.
It was decided that it would come in the form of weighted tennis balls from above. The method of doing so- a trebuchet.
It is over all about 8 feet tall. The counter wight in sixty pounds of disks. Average range is about 120 feet with a 12oz projectile.
It was decided that it would come in the form of weighted tennis balls from above. The method of doing so- a trebuchet.
It is over all about 8 feet tall. The counter wight in sixty pounds of disks. Average range is about 120 feet with a 12oz projectile.
Opening Day!
Hello out there in internet world! My name is Bill, and hopefully this one day becomes a spot that tinkerers and mechanics across the world will come to know. Stay tuned for home foundry adventures, blacksmithing, and my maniac mechanical projects.
Subscribe to:
Posts (Atom)


